


I sometimes think about how wonderful it would be to have the pattern designer sitting next to me when I open up a pattern and start to sew. We would chat about the inspiration for the design and I would get all of the dirt on design changes. There would be a lot of sewing talk as pattern pieces were nudged into place on the fabric. And when I started to sew she would gently stop me and explain that she much prefers 1/2" seam allowance. She proceeds to tell me the story of how she once had an instructor that carried on and on about the excessive nature of the 5/8" seam allowance and that's why she uses 1/2" seam allowance in all of her patterns. It's fun to think about it but I'm not likely to have the luxury of a sewing date with a pattern designer. At least it hasn't happened yet. That's why pattern designers put so much effort into the pattern instructions. It's their way of holding our hands while we sew our projects.
When I first started sewing I would always skip over the first section and head straight to the step-by-step instructions. I couldn't figure out how to read all that stuff and I didn't want to waste valuable sewing time trying to figure it out. No wonder so many of those early projects didn't turn out quite right. It's equally amazing how many turned out right enough. But there's no need for you to suffer through like I did. We're going to go through all of the ins and outs of the pattern instructions.


Different companies handle this information in slightly different ways. It can be in the form of a tidy little booklet like Colette Patterns. If you're using a pattern book like Alabama Studio Sewing + Design, there's usually a page or two containing this information preceding the patterns themselves. If you've downloaded a pdf pattern then this information is usually on the first few pages. We're going to be using a traditional fold-out version with the help of the Thurlow Trouser pattern from Sewaholic.
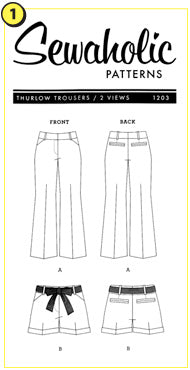
Technical Drawings
This can be found on the front or the back or both. Technical drawings are an excellent way to see the bones of a pattern that can be hard to determine otherwise. They show seam placement, dart placement, pocket styles, length variations, etc.

Pattern Piece Inventory
Once you've decided on the version you want to make you can find the pattern pieces you'll need to finish the project. This example list the parts for each view separately but often times there will be a single list of parts and beside each part it will name the view it applies to. I always like to write these numbers down. The back of the Makery's Project Planner would be a great spot. When all of the pattern pieces are flying around the room, it's great to cross-reference the list so nothing gets missed.

Fabric Layouts
Now that you've identified which pattern pieces you'll be using, this section will tell you how to lay them out to make the most of your fabric. There are a number of different layouts for each pattern. Circling or marking the ones you need is a good way to keep track of which ones apply to your project.
To find the version(s) you need it's good to go through the following list in order for all fabrics that apply (the main fabric, the contrasting fabric, the lining and the interfacing):
a Find the view you need.
b Find the layout for your size.
c Find the layout that matches the width of your fabric.
d Find the layout that matches your nap requirement (with or without nap)
An example

If I want to make a pair of trousers in size 6 and I buy a 60" wide fabric, I would need the layouts marked above.

Reading the Fabric Layouts
In this example, the fabric is folded with the right sides together (refer to The Key in #5). The selvedge isn't marked on this example but the grainline, which runs parallel to the selvedge, is shown on each piece with a straight line. So in this example the selvedge is the long side. You can sometimes move the pieces around a little bit but following the layout is the best place to start.
Any pieces or parts of pieces that extend beyond the fabric require you to open the fabric and cut it in a single layer. In this example, piece 2 is off of the fabric. Piece one and piece two are similar but have different fly requirements. We would trace all of the pieces as shown in the layout. Then out of the two layers we would cut all of the pieces except for piece 1. We would then open up the fabric, trace piece two in the empty space beside piece one and cut them both from a single layer.

The Key
The Fabric Key shows how to read the illustrations in comparison to the actual fabric and pattern pieces. This is a common code across many pattern companies but it's always a good idea to double-check before cutting into your fabric.
There are other symbols that get explained in this area. Some examples are darts, notches, buttonholes, body measurement markings, etc. Our example only includes the grainline.

Glossary
Not all patterns include a glossary but it's a good idea to check through it and see if there are any new or unfamiliar terms or techniques before you begin to sew.

Seam Allowance
Always check for this information before you begin to sew. Different pattern companies use different seam allowances. Traditional pattern companies usually use 5/8" (1.5 cm) Some of the independent pattern companies use 5/8" (1.5 cm) but others use 1/2" (1.25 cm). A lot of patterns designed for sergers will use 3/8" (1 cm). Most lingerie patterns use 1/4" (0.6 cm). Using the wrong size seam allowance on a project creates a large ripple effect that rarely ends well. Take the time to make sure you have the right one.

Step-by-step Instructions
These are the heart of the pattern instruction sheet. I haven't shown a picture of it but it's on the reverse side of the paper that I've been highlighting throughout this post. Start by finding the view that applies to you. Refer to the Fabric Key to make sure you are interpreting the illustrations correctly. Now it's time to finally start sewing. Sometimes the instructions can be hard to follow. Take your time. If I find myself really stumped by something I can be my own worst enemy. In my attempt to interpret what they were trying to say, I fill in the blanks incorrectly. If I take the time to go back to the beginning of the step, match up what's in front of me with the illustration and then reread the instructions slowly visualizing what I'm reading with the piece in front of me I can usually solve the problem. If things are really getting out of hand, I take a break. Sewing should be fun. Challenging, sure. But still fun. Sometimes a fresh perspective is all you need.
Next time we're going to be discussing tissue paper patterns and how to handle (or wrestle) them. If you want to see the other articles we've posted in Sewing Notions just click here.
Happy sewing,
Micheline