

The pattern envelope is the gateway to a successful sewing project. Pattern designers include all the information you need to know to get started which is why it can be a little confusing or overwhelming at first. In this post we're going to break down the anatomy of pattern envelopes and give a little insight on how to interpret them. After reading this you should have complete confidence to head to the fabric store and get all of the supplies you need to get your project off on the right foot. This is an information-heavy post but it will always be available for quick reference whenever you need it. It will be filed under Sewing Notions.
We are really lucky to have obtained permission from both Colette Patterns and Sewaholic Patterns to feature a couple of their envelopes in this and the next contribution to Sewing Notions. This is really wonderful because you'll be able to see how different companies handle and present the same information.
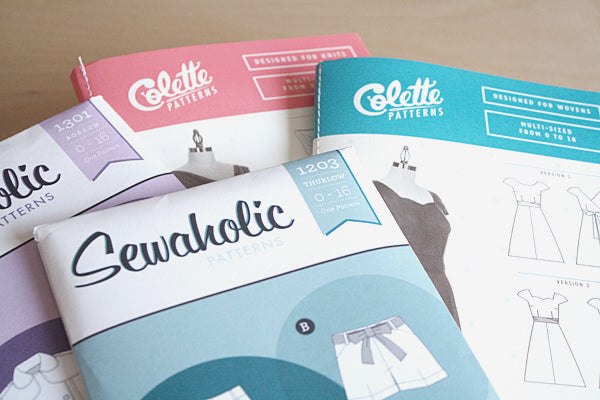
THE FRONT

A. The Pattern Company
B. Pattern Name or Number
Some patterns only have a name, some only have a number and some have both. Using this information to do image searches is a great way to gather inspiration for your project. It's also essential in communicating which pattern you are using with the company or other sewists.
C. Pattern Size
This indicates what size or sizes are included in the envelope.
D. The Pattern Visual
This is the section that likely drew you to the pattern in the first place. The first thing to notice are the different views or versions. It's important to decide which one you want to make since it will effect the amount of fabric or notions needed. Each view or version is labelled to help you figure out what you need when you look at the back of the envelope. These can be photographs, illustrations or technical drawings (Colette and Sewaholic have each included technical drawings and Colette has complimented theirs with a photograph. Illustrations are artist representations of what the garment will look like sewn up and on a person). Photographs and illustrations can give you hints about pattern selection. It can be hard to know when bold patterns like plaids or stripes would be a good choice. If there is a bold stripe represented on the envelope then it's an excellent candidate for bold stripes. The Colette Ginger is an excellent example of this. Doing image searches is also a great way to see how different patterns will look on your garment.
Some patterns include this information while others don't. There are a lot of reasons for rating a pattern as beginner, intermediate or advanced. Some of these include fabric choice, number of techniques used, number of pattern pieces, etc. Reading the description can give insight into the reasoning behind the level choice so you can decide if you're ready for the challenge.
THE BACK

1. Pattern Name or Number
This sometimes appears on the back as well as the front for easy reference.
2. Technical Drawing
This can be found on the front or the back or both. Technical drawings are an excellent way to see the bones of a pattern that can be hard to determine otherwise. They show seam placement, dart placement, pocket styles, length variations, etc.
3. Description
This can appear on the front or the back depending on the company. It's important to read through this section because it gives clarity to the visual. It will give information about fit, detailing, techniques or skills used and sometimes it will explain which patterns (stripes, plaids, etc.) will or won't work. If there is no level indication on the envelope, this can also help you decide if it's the right pattern for your skill set.
4. Notions and Supplies
This is where everything else needed to complete the project, besides fabric, will be listed. Things like thread, buttons, zippers, snaps and trim including quantities and lengths will be included. This can sometimes be broken down into views or versions so it's handy to remember which one you're referencing.
5. Fabric
This is a list of fabrics that are suitable for the pattern. These suggestions are usually broken down into main fabric and lining fabric (if there is a lining) since they often require different types of fabric. This is not a definitive list. If you choose a fabric with similar properties to the suggestions it will go a long way to a successful project.
These can be represented in Metric or Imperial or both. Sewaholic has recently added Metric to the back of their envelopes although our example just includes the Imperial measurements. This information is easy to find on some patterns but is tucked away on the envelope flap of others. These are the measurements that correspond to your body. It's not unusual to fit into different sizes in different areas. When referencing your pattern size to the amount of fabric you need, always consider what kind of garment you are making. For example, let's say your bust measurement is a size 6 and your hip measurement is a size 10. If you are making a shirt then your hip measurement isn't really a factor and you would reference the size 6. If you are making a skirt then the bust measurement isn't a factor and you would just reference the size 10 requirements. If you were making a dress you would need to take both of these measurements into account so you would reference the size 10 requirements since that would be the bigger of the two.
7. Fabric Requirements
Based on the version or view you've picked and your body measurements you can use this chart to figure out how much fabric you need. The chart will show the main fabric and any linings or interfacing not included under Notions and Supplies for each of the versions or views. Fabric usually comes in widths of either 45" (1.14m) or 60" (1.52m) and since the fabric requirements will usually differ for each of these, they are listed separately. Sometimes the amounts are indicated with nap or without. If your fabric has a clear direction in pattern or pile (like velvet that brushes in one direction) you will need to reference the section marked with nap since all of your pattern pieces will have to be layed out in the same direction which requires more fabric.
8. Finished Measurements
These are the measurements of the finished garment. Comparing these measurements to the body measurements can give you insight into the amount of ease in the design. Sometimes this information can influence the size of garment you want to make. For example, if you are making a T-shirt out of knit fabric and you want it to fit snugly, the finished measurement should be slightly smaller than your body measurement (negative ease). If you were making that same shirt but you wanted it to be loose fitting you would pick a finished measurement slightly larger than your body measurement (positive ease) and find your fabric requirement accordingly.
There is a lot of information here but in the next installment of Sewing Notions we'll have some tips on how to get the most out of it all. We'll be including a downloadable pdf to help keep you organized.
Happy sewing,
Micheline